DIY Bunk Beds
What. a. whirlwind. weekend.
In 3 1/2 days, 3 guys built-out and trimmed THIS:
For those of you that missed last weeks post, we have been planning out the transformation of our very large upstairs guest room into a cool and functional big boy room/playroom for Croix for months, and over the last 3 days a large part of that dream became a reality.
Here is the official "before" shot of the future site of the bunks:

We taped out the location of the bunk beds, stairs and the fort. Croix was making sure the tape was in the right place on construction day!
Things got started on Thursday when Brent's Dad and Laura rolled into town. The guys reviewed, tweaked, analyzed and finalized the plan and then headed to Home Depot to load up on supplies.
Once home, step one was covering the window. Initially we had hoped to keep the window, but it was just going to fall at a really awkward place, so we decided to cover it. From the outside the window looks just as it did, but from the inside, you would never know it existed. After that it was time to set the columns (2, 2x4s) against the left wall. These columns were especially important because they set the stage for the stability and overall layout of the bunks. The stud locations were really important here because the guys planned to anchor the columns to the studs for optimal stabilization. So, the base was increased in depth 9" to catch the stud. This 9" space would allow us to create a lip along the front + a small ledge at the back for glasses, phone, cup of water, etc...
Next, they got started on the frames for the mattresses. The plan was to create Queen size bunks because A.) the room could handle this size, B.) we already had these mattresses and C.) we wanted bigger beds to give our home additional guest bed options when family or friends were in town.

With the bottom mattress frame in place they installed the columns on the right side which were constructed of 2, 2x6s. These columns are bigger because more stability was needed since they would be free-floating in the space, not anchored to the wall. Remember, ability to anchor to the wall is dependent on stud location.

Electrical work was next. The guys tapped off an existing outlet to add an outlet, switch and sconce light for each bunk.

With the framing of the skeleton up and the electrical in place it was time to start putting up the paneling.

Croix and Gates were inspecting the paneling work on the bottom bunk, making sure everything was secure :)

Below is a shot that sums up Saturday....two guys working on top to cut down the verticals and two guys working down below on paneling. If we could have a house full of willing workers with every project we would be unstoppable! :)

Oh, I forgot the other guy that was around for all the action all weekend long - The Croix!

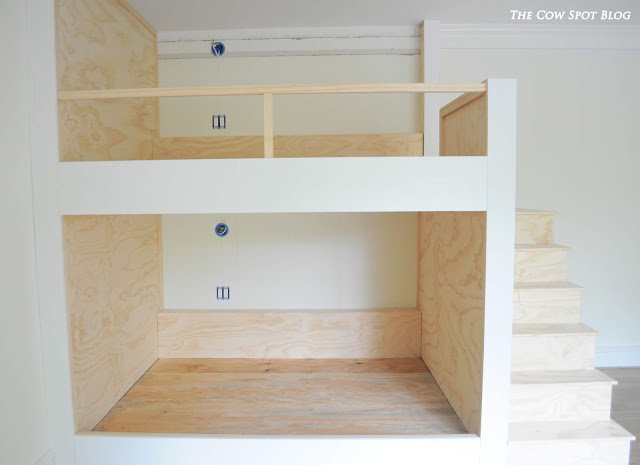
With the verticals cut down and the paneling up it was time to get the top rail installed. We added that vertical in the center so the rail would be stable, but I really like the craftsman look it brings to the whole piece. The tiny platform you see in the photo below is the landing for the stairs!

Next, came the most technical, pain-in-the-butt portion of the project....THE STAIRS. Oh the math, just typing about it makes my head hurt but here we go.... We couldn't use the standard pre-cut stairs that Home Depot offers because we had a fixed height (rise) and depth (run) that we had to achieve in order to hit the landing and ultimately the upper platform to enter the bed. We knew we wanted a 2' platform at the top so we started from there. We had to build the platform an extra 6"" deep to get past the column at the wall. This left us with approximately 39" to get 5 steps up to the platform with one last step from the platform into the bed. The steps wound up being approximately 8.5" high (rise) and approximately 8" deep (run). The frames for the stairs were cut into a 2x10 board using precision cuts from expert craftsmen Bruce and Phillip Shearer.

This was by far my favorite part of the project - does it get cuter than mini stairs?!

Initially, the plan was to panel the side of the stairs, leaving only the small section against the wall for a little door. But the more we looked at it, we realized, covering up the small area right under the stairs was a missed opportunity for more storage and more charm, so....

We kept it! We will either leave it open or maybe add a little shelf inside for books/baskets.
The stairs were the last major construction element, so once those were in, the only thing left to do was to add the finishing boards over everything. This material is what gives the boards a nice smooth look - all ready to paint. The majority of this step went down on Sunday morning and by Sunday at lunch time, things were looking like this....

Talk about a labor of love! So many people took time out of their weekend to come and help us/cheer us on and we are SO happy with the results. Croix LOVES it and goes up and down the stairs over and over again. He's so excited!
Obviously we still have to sand, paint, add the little door, figure out a rail for the stairs, install lights, etc., etc. but for now we are relishing in the fact that THIS awesome beast is upstairs, only weeks away from being ready for Croix to move in!
Obviously we still have to sand, paint, add the little door, figure out a rail for the stairs, install lights, etc., etc. but for now we are relishing in the fact that THIS awesome beast is upstairs, only weeks away from being ready for Croix to move in!
All photos are my own.